RadioactivityCounter - Android 
This application is a real working radioactivity counter without any extra hardware needed ! Only cover the lenses with a black paper and tape it there (Must be tight and light proof - don't put glue on the camera lenses !). It will turn your phone into a Geiger Müller Counter to measure radioactivity after proper calibration. You can use it as a rough indicator without calibration to distinguish between high and low counting areas. A LITE version is also available as pure Counter. どうか、もしあなたが手助けを必要とするなら、電子メールを書いてください。
rev 1.4
a. new function in the settings menu. Now you can enter the background radiation in steps of 10 nGy/h. The CPM-zero (background noise) in the adjust menu has now 2 digits, important as you need a more precise background count for this to work. Important to get values below 1 uGy/h you really need long measurements. The adjust menue now shows teh values starting from 0.01 µGy/h
b. The video windows is overlayed by a mean value which sums up until you press the CLEAR button. This helps measuring low radiations. The CPM value is also displayed you can use this to set it in the adjust menu, when the background radiation is known.
c. some displays have been optimized, the main display now shows quickly raising values and resets the interpolation.
d. bug in the map menu should be fixed (it was set to a fixed value).
----------------------
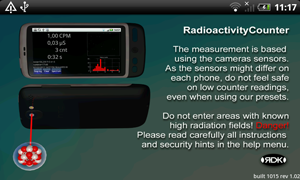
We did measurements with some of our phones, the data is printed on our homepage as reference. As the sensors might vary on the same mobile phone models and we need more feedback on this, currently we didn't use the measurements automatically for your mobile phone (which might change in the near future). We also plan for a special calibration service for individual devices!
quick start
First you need a black tape to cover the lenses, so no light can enter the camera!
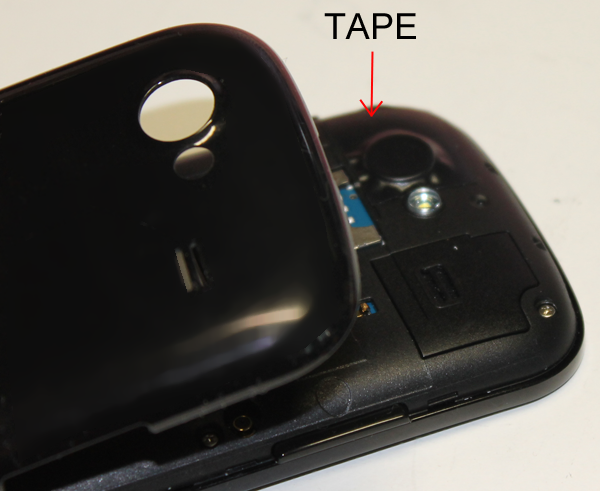
Here we used the tape after removing the backcover. If this is not possible you need to place the tape on the outer side, especially if using the frontcam.
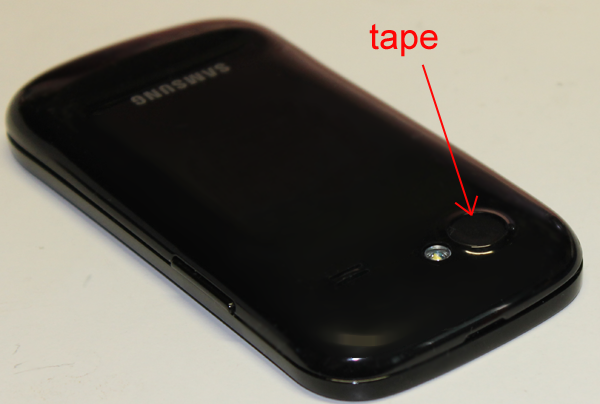
The tape must be totally light-dense. After the next step (calibration) you need to test it with a bright lamp in front of the camera. No counts should be registered. You can double or tripple tape, buts important that no light enters the camera.
Next the noise level must be found. This is important that the zero count rate is not too high. Usually more sensitive phones have a low noise (our best has a value of 2 the worst between 30-60). if COVER LENSES is displayed, cover the camera with a tape (either the BACKCAM or if used the FRONTCAM) - Compare it with our tables. Use our value if it is higher than your measured value to be more precise.
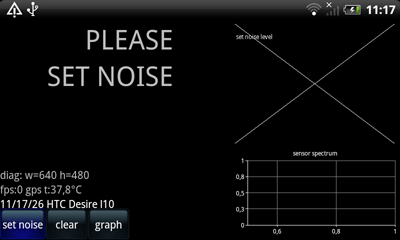
Set Noise can be done using our calibration function. It will measure the sensors and try to find a good level for start.
You need to cover the lenses first with a dark paper and fix it to the case. Do this carefully and don't damage or scrap the lenses parts (if you need the camera later to take photos). No light should enter the lenses, though we compensate for uneven values but if a beam of light comes in you get a false count. Athe App searches also for a frontcam and uses it. Some mobile phones are better with the frontcam when sensing radioactivity. You can change it in the settings menu, especially when you look into our tables for your phone.
Next start the set noise function. On the first time you start the phone you can use the button on the start page later you can use the menu item for calibration.
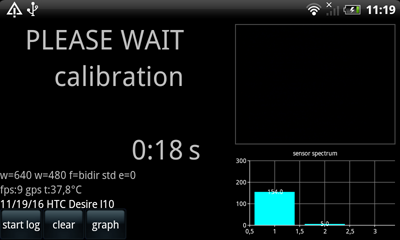
Attention this does not assign counter values to Radiation values like Gray/h or Sievert/h. Additional steps are necessary for this. For our App we use the Gray/h unit as this is more honest measurable than Sievert/h the equivalent dose (meaning full for humans). For Gamma and Beta Radiation (CS137) its a usually 1:1 relationship between them.
The calibration takes around one minute - If you live in a high radiation environment, you should shield the phone with lead !!!
After the calibration is done the phone can click from time to time which is great. Its should show a rate of around 1-10 CPM. Below is a phone with a very high noise value, then the CPM-zero (or Background Count) might be higher and difficult to get low without reducing the sensitivity too much.
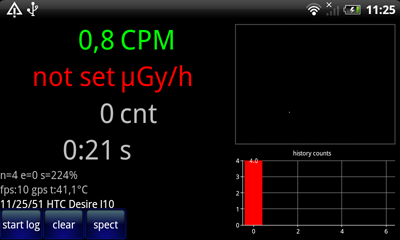
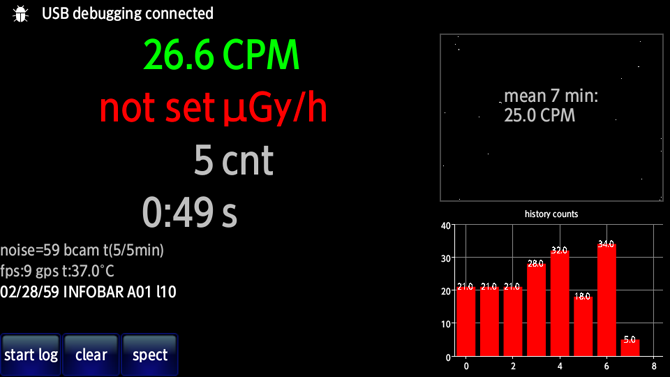
If its too high you should increase the noise level to get a reasonable background noise. If you see dots around a circle check the lenses cover light might pass through. Also test to put it to a bright light source, the counts should not increase. If the displayed spectrum is very wide you should try a different filter (filter setting) or a lower exposure.
Example: here the noise setting is too low. A higher value is necessary. The spectrum on the right lower side show a lot of noise also with higher amplitude which is not that good for our detection system. Typically the borders have dots which also indicates a sensor noise (not radiation). A value of n=20 would be better in this case (the A953 is currently not listed in our tables it looks as it has similar values to the MB525 in the list)
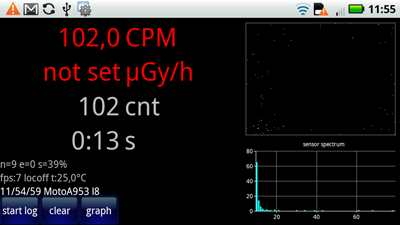 (old displayrev 1.3)
The spectrum is the right image on the main screen. It can be switch to a bar graph when measuring is done. Radiation typically introduces a wide spectrum with lot of peaks. The current spectrum can only be used as a rough estimation on the incoming radiation. As the images are filtered and merged we cannot determine the kind of radiation or material used.
This need a little bit experimenting (we will help you on our home pages with settings as soon as we have valid data for the phone of course), or write us with a screenshot if you need help.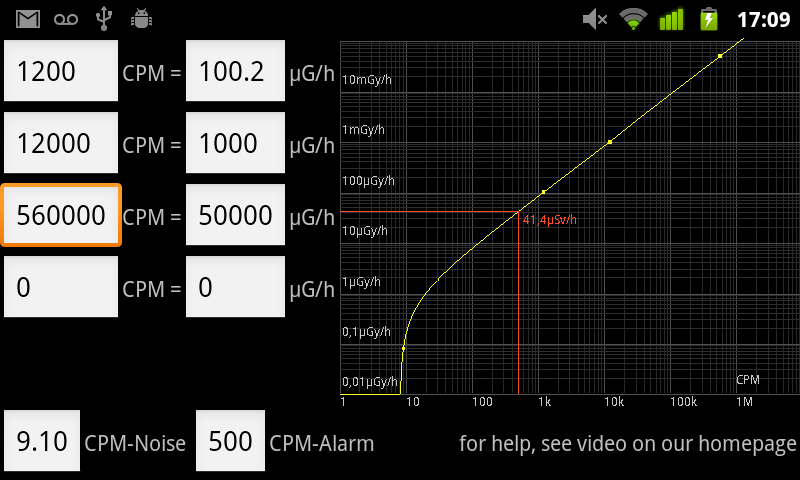
Now you can try to record and look at the rate. We used a professional system called Buchler Anlage (Helmholtz Reserach Center Munich) which can generate radiation from Mikrosievert/h to several Sievert/hour with calibrated values.
Usually the background radiation is around 0.05 - 0.15 Mikrosievert/h. And a Granite Stone has a value of around 0.4 Mikrosievert/h, which should be very hard to detect with most phones, you really need a higher radiation or wait very long. Mobile phones can detect radiation starting around 1 Mikrogray/h for our for the best of them up to several hundered Mikrogray/hour for the worst. Take a look at Wiki for explanation on Gray and Sievert. For Beta and Gamma radiation they are almost same (with a CS137 source).
Example of the Statistic display on the Samsung Mini (you can email the statistic as a CSV file):
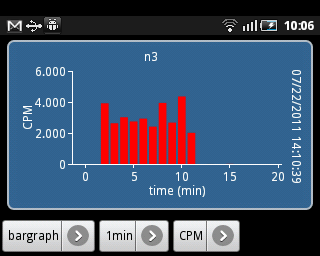
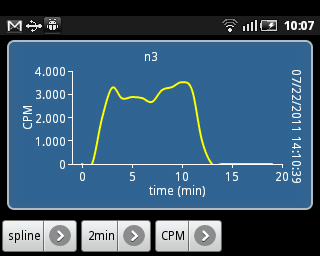
As the sensors are temperature sensitive, try to keep the phone cool, e.g. don’t use a power adapter during measurement. We display and save the temperature along with the measurements.
Menus in detail
Main screen
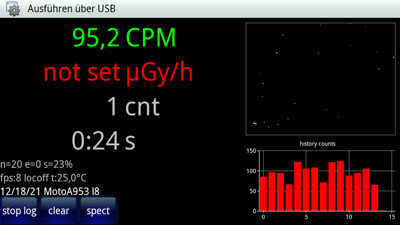
This is where all the action goes on. The right upper shows a camera images (should be dark when covered correctly). Dots can appear when we find a ray hitting the chips. We display a maximum of 200 rays per frame, so on high radiation fields only a part may be displayed. You can test if you uncover the lense the a lot of dots appear (due to the light) but also a message will be shown after a while.
On the left upper site the CPM value (Counts Per Minute) is displayed and below the value in Mikrogray/h if the assignment in the adjust menu is done to define how many counts are how much of MikroGray per Hour. The unit changes automatically on higher radiation values to mGy/h and Gy/h. The value is green when 5 Minutes measurement have been done. If you press clear it will become red again
On the right bottom we can display either a spectrum (helpful for checking out the device) or a graph with one bar per minute on the last unfiltered counts.
The numeric and textvalues.
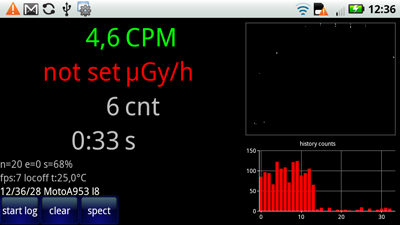
n=20 means noise level is set to 20 units.
e=0 means standard exposure (usually don’t change it in the settings unless we give instruction in a table)
s(9,10m)=23% means standarddeviation is 23% of the last 5 minutes measured. This is the tolerance on the measurement. If the source changed it will increase and decrease if stable. In brackets new with version 1.1 the first number shows the time passed in Minutes for the interpolation and the 2nd number shows the total interval used (set in the “settings” menu).
fps:8 means 8 frames per sec, which is not too good but still ok. Higher frame rates also imply higher sensitivity.
locoff means no location recorded. There can also be a gps if gps data is valid and location on. Location is only saved at the beginning if you start a new log with “start log”. t=25,0°C is the temperatur of the battery (usually also similar to the phone. We show it as some phones are getting higher noise values if the temperature increases very much. Especially when the battery is charged. Later we might provide a temperature correction if this becomes necessary. Then comes the current time as recorded. Attention the DATE of your phone must be set correctly. If not you might get a license message on the CHART display (sorry for this but we used a tool for this display currently) If the date is set correctly (>= 2011) everything is ok.
Next comes the name of the phone as we can read it (important for later automatic calibration with tables which we currently are not using), and the next is l8 in this example which means API level 8 (the lowest we support).
Set noise
The left button on the first time show this text, and a noise setting should be done after covering the lense. Later you can repeat this anytime using the menu. When you change the noise value also the assignments (adjust menu) might be corrected again. Its important to keep the noise level at a fixed value during measurements.
Start Log / Stop Log.
Once the "Set noise" is done the button changes to a toggle button. If you start a log a text field appears and you can enter a name for the log file. Each minut a value is saved in the log with time stamp and many infos. At the beginning also a location value is saved if the location is enabled in the settings menu.
clear
You can clear the current CPM (count per minute) value and the measurements restarts. After 5 measurements the CPM value turns green.
Statistic / Graph
This button toggles the graph display between spectrum and the bar graph. Up to one hour is displayed as a bar graph. Example after the radiation soruce is removed some noise is recorded and has a mean of 4.6 CPM. The log is stopped now in this example. You see s=68% which is a high value typically for random noise at the ground level (more than 5 min sample time might be needed - the log in the statistic has more options and you can also use the CSV for analysis on your PC)
Menu:
with the help of the menu you can reach different parts of our application:
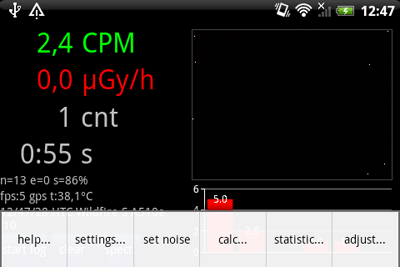
Help...
almost same as this text but more compact.
Settings...
The setup menu allows for changing of the noise values and other features as explained:
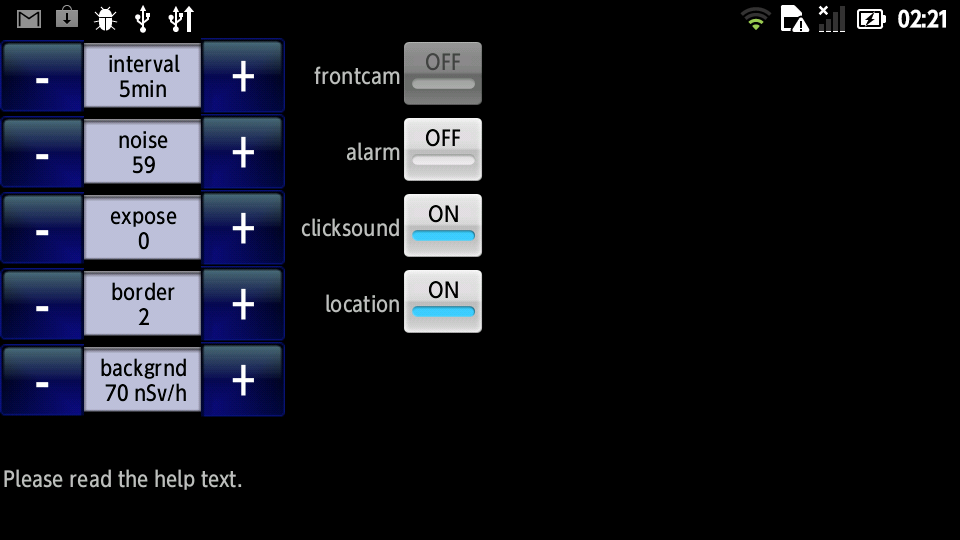
Noise: This is the most important value. A low value if possible means also a high sensitivity. A increase by one usually menu a decrease by 10 % for most phones of sensitivity.
Exposure: Usually should be kept at zero, but a different value might help to increase the sensitivity, but also can increase the noise.
Filter: removed with version 1.1 no longer needed.
Interval: Set the interpolation interval of 5,10,15 and 30 minutes for the main display.
Border: some cameras show a lot of noise at the border. If you discover this increase the border value (this also decreases sensitivity).
Backgrnd:
This sets the default background radiation. You need to get this value from you location. Usually between 60 nGy/h and 300 nGy/h. Important is also to set the CPM0 (CPM-zero) in the adjust menu using a longtime measurement with the background radiation. Only if this is very precise your ground radiation will be displayed correctly. Use a log file or the new main menu function with the overlay display of the mean CPM values (suggest to measure this for 12 hours).
Enable Alarm:
The alarmlevel (set in the adjust menu) will trigger and acoustic alarm and also a symbol in the main display for a short time is displayed.
Enable Location:
The location data will be saved along the log file
Frontcam
If a front cam is found you can enable/disable its usage. Usually front cams are more sensitive but also have a bad noise level. So on some phones where the standard sensor is not very sensitive to radiation the frontcam might help. Some of our data in the tables on the homepage show a frontcam measurement (Android 2.3.x needed for this feature to work).
Set noise
As on the main menue for the first time the automatic determination of the noise value is started.
Calc
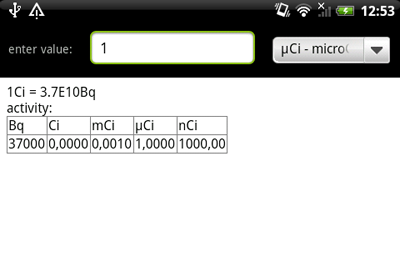
A small unit converter for your convenience. Some values are approximations as some units cannot be converted directly into each other, so we had to make some assumptions as QF=1 used for example. This gives a rough value between dose and aquivalent dose calculations. Sievert is very popular but difficult to determine, because it describes how much a biological body is affected by the radiation. The more technical value is Gray (Gy). Its the absorbed dose of ionizing radiation (like X-ray, Alpha- Beta or Gamma- Rays). Its defined by the absorption of this radiation by one kilogram of matter. (1Gy = 1 J/kg = 1 m*m/s*s). We display usually the dose rate in Gy/h that is how many Gray are emitted in one our. The dose is then calculated by multiplying the time of which the matter is exposed to the dose rate. Same applies for the unit Sievert which is defined as the dose equivalent radiation. The biological effects of ionizing radiation are attempted to quantitatively evaluate. The equivalent dose to a tissue is calculated by multiplying the absorbed dose (in gray) bei a QF factor. For electron, und photons of all energy (x-ray and gamma rays are photons !) QF=1 for Alpha particles its 20 (which we cannot measure). See Wiki for more infos.
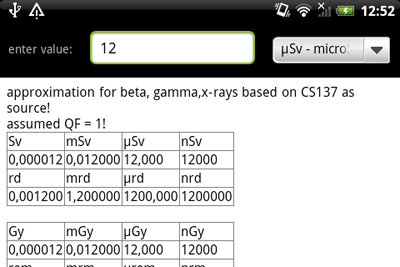
The unit BQ = becquerel is the newer unit instead of the older Curie. It defines the activity of a material in decays per second, that is how many atoms per second of an isotop decay into a different one by emitting radiation. Its not telling about the kind or enery of the emitted radiation.
Statistic...
Here all log files are displayed in a list. You can select one entry and then the stored graph is displayed. There you can also send it by email, or save it to the sd card (you always need a sd card in the phone to use these functions). For email a CSV attachment is used (ready to import by Open Office Calc or Excel). You can also save it as html file.
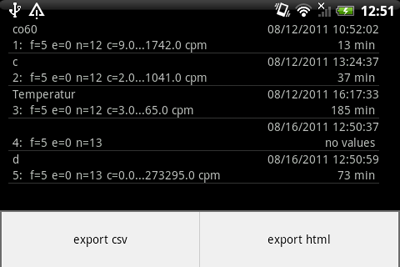
In the statistic overview you have also menu items to save all values to a file (csv or html). They are all saved to a file on the sd card. Attention the save function in the next screen uses more details in the file.
You can also delete a log file after clicking on it and delete it in the next screen.
Statistic details... (click on a table item)
The statistic shows your logged data with 1 bar per minute. You can also use interpolation to smooth the data set and display different types of stored data. The counter per minut values are stored automatically for three different noise level, the one you set but also +1 and +2. This is in case the camera sensor starts getting noisy you will see it and have still usable information.
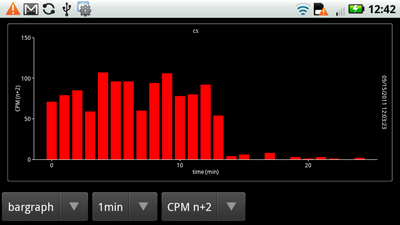
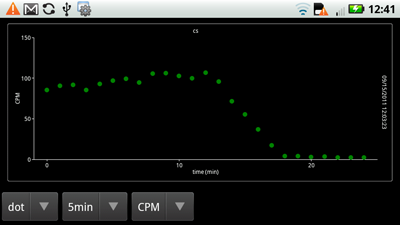
above a display in the dot notation is shown, also slines, lines are possible.
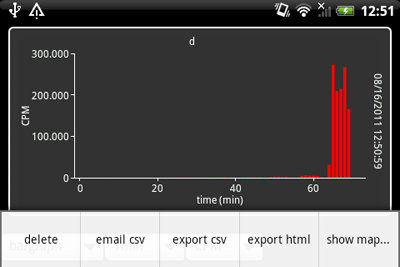
Above you see the menu. With delete you can delete the log file. With email you can send it to an email account and with export csv or export html you can save it to your sd card (root). For email we also save a file and you need an sd card in your mobile phone to use this feature. A show map shows the location where you measured the data if you location setting is enabled.
New in version 1.3:
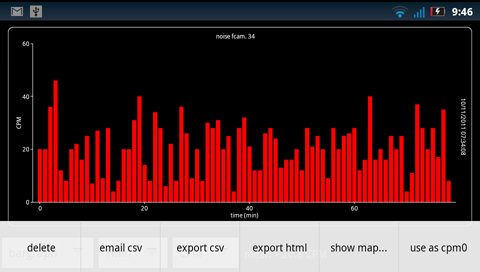
The “use as cpm0” menu allows you to set the mean value automatically to the CPM-Noise in the adjust menu. Best is to record around 30 Minutes of Noise (without any radiation source). The above image shows a rather bad sensor with lots of noise (DROID 3), try to get the CPM0 noise close to the setting in our tables by increasing the Noise value (n) in the settings menu. But some cameras have noise with all amplitudes. It still works, buts usually not that sensitiv for low radiation values.
Adjust...
This is the most complicated part. Here you can assign up to 4 data points to give a relation from Counts (CPM) to MikroGray/h. A graph shows the resulting curve. You can also define an alarm level in CPM. If enabled in the settings menu an alarm will occur and also a symbol displayed in the main menu. You get some values from our measurements on our homepage: www.hotray-data.de
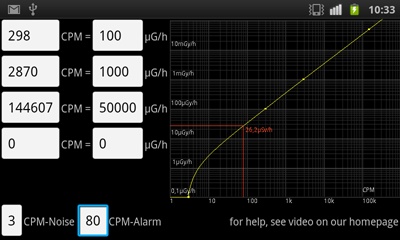
CPM-Noise is also named as CPM0 in our table. The value depends on your measurement, if you have a higher value try to increase the noise setting (n), and repeat the Zero Noise measurement. If it differs not too much set CPM-Noise to your value.
Help (this file)
Radiations
There exists many different types of radiation from which the following types are one of the most popular ionisation radiation types.
Alpha Radiation
The alpha particle is equivalent to a helium atom nucleus. It contains to protons and two neutrons. Its emitted by radioactive material with a atomic number greater than 82, for example Am241, TH232, U238 or PO210 (a pure alpha radiator). For Am241 a decay energy of 5.63MeV is emitted. But the alpha particles a absorbed quickly by matter. In air they can travel some centimeters (Am241) in Water 0.0048 cm, Paper 0.0034 cm. So skin blocks them quickly for example. This is also the reason we cannot detect alpha particles with our App, as the lenses, even our cover will block them completely. Alpha radiation is dangerous for the human especially when getting into the body.
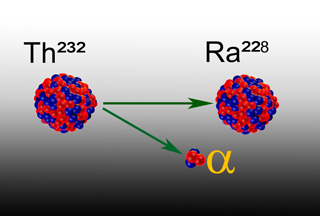
Important the camera sensors cannot measure the alpha-radiation as its blocked by the housing, lenses and cover of the mobile phone.
Beta Radiation
A beta particle has same mass and charge as a electron, but its origin is the nucleus. Beta particles may be negative charged (as the electron) put also carry a positive charge (positrons). NA22 or K40 are sources of Positrons for example, where CS137, SR90 emit negative charged beta particles. Beta particles may also be produced in pairs (one positive and one negative).
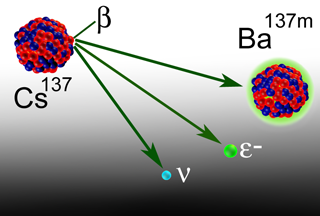
A negatron or negative beta particles is emitted from a decay of a neutron (n -> (p+) + (beta-) + antielectronneutrino.
Also a antielectronneutrino is emitted at the same time carrying some energy. This particle is very difficult to detect (1 lightyear on lead absorbs one particle!!) and has a very small mass. Below a decay process of CS137 is shown. The CS137 decays to a BA137m Atom (in an energy state) with two particles emitted an electron and a electronantineutrino. The beta particles can be measured by the App, as they can reach the sensors usually. Beta can travel in air with 1 MeV 3 meter. When metal with a high atomic number is brought in the way also so called Bremsstrahlung might be emitted, for example when using lead, which can penetrate much deeper.
Gamma Radiation
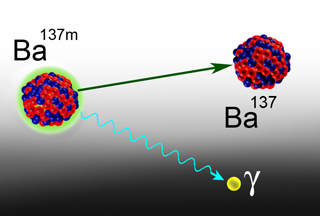
Gamma (and X-Radiation) - Photons are emitted by an unstable nucleus during radioactive decay. Gamma radiation also occurs on the annihilation of a electron and positron (resulting in two photons with 0.511MeV). Gamma radiations has a dual nature it behaves as a particle (photon) but also as a wave. Gamma radiation is difficult to shield. When interacting with matter, differently things can occur, for example high energy electrons can be emitted (and a so called hole for semiconductors) which collide and emit secondary electrons until all energy is used up (we can detect this !), or a electron positron pair can be produced when the energy is larger than 2*0.511MeV, and the positron quickly collides with an electron resulting in 2*0.511MeV photons, which then can collide with matter and emit primary electrons.
Experiments
Don't experiment with radiation sources - this is dangerous !
But you can check some natural sources of radiation if you are a lucky owner of one of the more sensitive devices.
1. If you fly on a airplane, at around 10000m height you might get a radiation of around 10µSv/h (switch on the airplane modus of the mobile phone first!). Send us the counter results.
2. If you have some mineral collectors or are one of them, check your minerals out. Some of the have even higher radiation values. Be careful and store them in thick lead if not done so far ! For example Uranium Ore is a strong alpha radiator (which we CANNOT detect), but due to the numerous decay substances also Beta and Gamma rays are emitted.
3. Check your food. In Germany some mushrooms in the Bavarian woods have measurable values (which might not be dangerous at all - but I wont eat them with a noticeable counter reading !). But be careful without a real calibrated device the reverse is not true also, no reading in counts does not mean its safe !
4. Airplane Control: Check the X-ray on a flight travel check but don’t cause a panic (switch off the alarm modus when you pass the mobile phone into the device).
5. KCL: Kalium (Pottassium) is a natural radiation source. Pottassium contains 0.012% of K40 the radioactive isotope. Primary a beta radiator. 1kg of pottassium chloride has around 16000 Bq (Activity measured in decays per second). Kaliumchlorid is also known as E508 added to food. Kalium (pottassium) is needed by the human cells and around 4000-8000Bq from the human body are from the K40. K40 has a half life of 1.277E9 years. With our most sensitive mobile phones you can measure the decay (if you use a square of KCL around 1cm thick it will be around 1.6 Mikrosievert/h which is on the minimum side of what we can measure when measureing for several Minutes and using the mean value). The radiation is absorbed by the KCL itself so thicker layers don’t produce much more beta radiation. 1g of KCL produces 16 Bq which is hard to detect for us. See Wiki on Pottassium (Kalium). Interessting the K40 also emits with a lower rate Positrons with 1.5MeV but they are annihilated when colliding with an electron quickly into two 0.511MeV Gamma rays.
Currently we only measured a handful devices, even from the same brand / model the sensors might be different. we work on a professional calibration service and also start speaking with the manufactures. In this phase values must be observed carefully and only relative measurements (at the same temperature of the device) might be really useful.
Security Hints
Again: Don't experiment with radiation sources - this is dangerous !
First: A high radiation field can damage the CCD or CMOS sensors and the electronic of your phone. The sensors can get permanent non functioning or dark spots (usallys there are already some due to the normal radiation), CCD sensors are more sensitic to this damage as CMOS sensors (most used in mobile phones).
Second: A radiation field can be a heath risk be careful when experimenting with radiation, avoid any exposure to your body.
There three important rules working with radioactive sources:
1. Time: Reduce the time of exposure. The shorter the time the less is the effective dose.
2. Distance: According to the inverse square law the dose is reduced.
3. Shielding: Shield the material. Alpha rays can be shielded already with a piece of paper, beta rays can be shielded with low density material, as plastic, wood, water or acrylic glass. Be careful as some materials produce so call Bremsstrahlung (gamma rays) like lead. Gamma, X-Rays or cosmic radiation are most difficult to shield. Material with heavy atoms is required as for example lead. The dose is reduced exponentially with the thickness of the lead (or similar material). Typically CS137 produces such radiation. In some cases shielding can make the situation worse, when radiation interacts with the shielding material and creates secondary radiation.
4. Optimization: Keep the radiation exposure as low as possible all the time.
Literatur and Links:
1. Radiation Protection - Wiki
2. BFS - Bundesamt für Strahlenschutz (germany)
4. HelmholtzZentrum München (AMSD radiation facilities - calendar - Buchler OB 20)
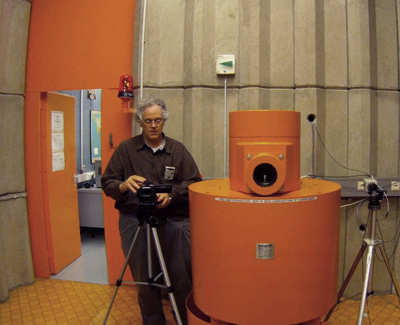
Dipl. Ing. Rolf-Dieter Klein, setting up the test equipment at the Helmholz Zentrum, on the right you can see the programmable radiation source we used. In a thick lead mantle the sources are hidden as long as we work in the room.
A special thanks to the BFS (Bundesamt for Strahlenschutz München) and to the Helmholtz Zentrum München especially on Prof. Dr. Hoeschen and his team for providing us with helpful hints, giving us access to the devices and for future work on sequel projects.
more information and products on our homepage www.hotray-info.de
current tables of our measurements for devices www.hotray-data.de
(C) 2011, Dipl.Ing. Rolf-Dieter Klein, a development for our company HOTRAY Ltd., Kehlheim.
(C) 2018 MultiMediaStudio Dipl. Ing. Rolf-Dieter Klein